A Professional Demonstrates her Pie Crust Recipe
Posted by Pie Guy
Makes one 10 to 9 inch pie, double crust, dough. Total prep
My friend will help you make a Perfect Pie Crust.
Pie Crust Recipe I Used For Years
Hi, my name is Christina. Today, I’m going to show a recipe that people have problems with, which is flaky pie crust. It’s actually really simple. So I’m going to show you the recipe I have used for years and explain how you can change some of the ingredients to get the product you want. It is very basic.
There are mainly three main ingredients: flour, water, and fat. And then I add some sugar and salt for flavor and also for the browning of the crust.
The Flours
First of all, you will find the flour in most of all pie crust recipes call for pastry flour. Pastry flour is different than bread or all-purpose flour in that it has less protein.
[sc:ADtop]
So pastry flour will give you a softer product and end up with a flakier and tender crust.
Bread flour has more protein in it and will give you a tough thick crust which you really do not want for your pie.

Cake flour has less protein than pastry or bread fluor. It will give you a too flaky, too tender crust that will crumble and just fall apart. Cake flour basically has very little binding and tends to not hold together.
My flour to use for pie crust is…
I usually just use all-purpose flour because it is very similar to pastry. It is what I have in my home. If you handle it right, you can still get a flaky product as pastry flour.
Some recipes will recommend using bleached flour because the bleaching process takes out some of the protein. So again, it is a little bit softer, and it will give you a more tender crust, but what it does to the flavor is funky.
I prefer to use unbleached because it gives a more natural flavor. You can also do a combination of one-third pastry and two-thirds all-purpose or whatever you want to get a different product.
Sugar and salt for taste and color
So flour is the first thing that goes into the crust. Along with the dry ingredients, I’ll add my sugar and salt. The recipe I go with is called 3-2-1.
3 cups of flour, 2-sticks of butter or 8 ounces with 1 cup of ice water. Add a tablespoon or two of sugar with a teaspoon of salt to the flour and incorporated completely with your hand or use a fork.
For a tasty pie crust, use this fat
The next thing to add is your fat. There are different things you can use for your fat. You can use lard, shortening or butter.
Lard has a really sharp flavor which you really would not want to use for a sweet pie crust but more for a savory pie. However, leaf lard is natural in flavor and can be used in sweet doughs. But it’s difficult to find.
So your real options here is butter or shortening. Shortening has 100% fat, while butter is 80% fat. Butter has more solids and liquid in there.
However, I still prefer to use butter because it’s more natural, and the flavor is better. Furthermore, shortening can be more inconsistent in the quality and flavor.
I never have shortening at home anyway, so I just stay away from it. But if it is what you prefer feel free to use it because of more flakiness due to 100% fat.
Can’t make up your fat mind, then…
You can also do a combination of half butter and half shortening or what ever. Since shortening is neutral, it will take on the flavor of your butter.
So I use 8 ounces of butter and cut it up into small cubes. One of the most important things is to keep it very cold. The same is with your flour. Some people actually keep their flour in the freezer for recipes like this. Keep your butter in the refrigerator up to the very second you are ready to use it.
Put the butter in with your dry ingredients. You can use a stand mixer on really low speed or do it by hand. Break up some of the butter in the bowl.
The reason you want your ingredients cold is because if they are warm, it will come together really quickly. You want some of the butter pieces to stay separate.
But my dough is chunky
You still want to have some chunks of butter when you’re done so that it will create some layering in the dough.
Run mixer about a minute or so. The flour will take on some of the moisture in the butter because some of it has worked in, but you should see a fair amount of butter chunks in the mixture.
Slow and easy with the liquids
The next thing to add is the cup of ice water. You don’t want to add it all at once because depending on the temperature and the humidity in the room it might take more or less water to bind the dough.
So I use a majority of it first, add it, then mix it to check. Now just add it at a tablespoon at time if it needs it.
Tips I do not follow
One tip some people will tell you to do is to add a teaspoon of apple cider vinegar to the mixture. What acid does is to weaken the gluten. Gluten makes your dough stretchy and hold together. Vinegar weakens that and gives you a really soft dough that’s easier to roll out and will give you a little acidity flavor.
I really don’t do that because it’s just one extra step to follow and an extra ingredient to worry about. It really does not make a huge difference unless you are having problems rolling out your dough and it being tough.
Nothing better than your hands
So at this point give it a few turns in the mixture or with hands. Be really careful not to over mix the dough. So if it is looking really dry add a teaspoon of water at a time.
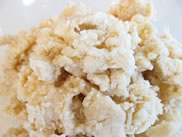
The mixture should still seem dry and not completely incorporated, but when pinched it holds together.
If you mix it completely in the mixer, it will get overly mixed. So dump the mixture onto a lightly floured surface and finish it by hand.
Dough looks dry. That’s good!
You see a lot of dry pieces, but that’s fine. So what you want to do to finish the dough is not to kneed it but just keep flattening it and fold it onto itself three or four times.
What this does is allow the layers of butter to stack on top of each other, which will give you a nice flaky crust. Don’t try to totally put all the dough together like one big mass. It’s still going to feel a little loose.
What you want to still see is pieces of butter with loose dough. Because when the dough bakes the liquid trapped in the butter is going to steam off, lift and create layers between your dough. This is what you want. Right?
Wrap it and cool it
So at this point you would cover it with plastic and refrigerate your dough for about an hour. What that does is to rest the dough and relaxes the gluten so its easier to roll out. It also helps the dough to keep its shape and not shrink until its ready to bake.
How to roll your dough
Flour your surface again. After the dough has been resting for a couple of hours in the frig its ready.
If you sliced the dough, you would see layers of butter and how flaky it would be. So place the dough on your surface and flour the top. Try not to move your body when you roll.
Roll in straight of you and rotate the dough around instead. Turn the dough and flour the surface more if it sticks. By turning your dough you are insuring its not sticking so that when it comes time to lift it to your pie pan it will not stick and tear on you.
As you are rolling you will see good sizes of butter in the dough and this is what you want to see. It’s what you want? Yeah. Roll it to about 1/8 inch thick. At this point, the crust is ready to be used.
Your bottom is fine
Your bottom crust does not need to look perfect, so don’t fuss over it too much. I like to use a clear glass dish to bake pies. Not only can the heat get through, but I can see when the bottom crust is done and cooked evenly. Cook the pie towards the bottom of your oven.
You can use a ceramic pan. It conducts heat really well, but you can’t see the bottom. Metal is really durable but again, you can’t see when the bottom is cooked evenly.
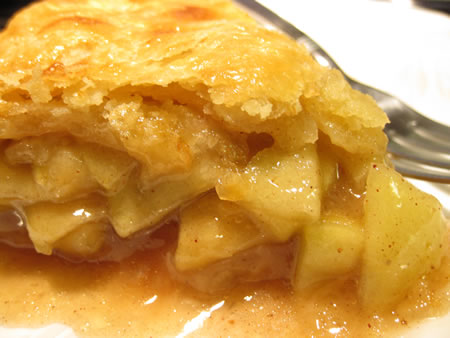
Apple filling is what I like
I like to use a partially cooked apple filling. I use granny smith and cook it on the stove top with some sugar, lemon juice, vanilla, cinnamon, ginger and cornstarch for thickening. Let it cool before adding to pie.
Top it with your crust
Layer your top crust on. Attach the top to the bottom. If the crust is giving you some problems, you can wrap the crust around your rolling pin and un-roll it over your pie.
Cut the excess about an inch from the pie. I like to take the top crust and tuck it in under the bottom layer and press it together so you don’t see any bursting after the pie is baked.
You sometimes get spots where there is more dough than other areas. Just take some of your scraps and tuck it in the thin areas so that your trim will look consistent all away around the edges.
To finish the edges you can do whatever you want. Some use a fork, some crimp it with their fingers.
Chill it one last time
Once you have this done you can refrigerate it for about a half-hour or freeze it for 15 minutes. What that does is it keeps the ingredients really cold so that when it actually goes into the oven, its going to hold its shape much better.
After the pie is chilled remove it and egg wash the top crust with a pastry brush. The wash is an egg mixed with a tablespoon of ice water. This is going to give you a really nice shiny golden pie.
You better vent that top crust
One thing you want to do with every pie, especially fruit pies is to vent. When it bakes a lot of steam is going to come out. If you don’t have any vents for it to escape from, it’s going to burst the top crust and force its way out destroying your nice pie.
Your sides will be ruined; the filling will pour out from the edges and smoke up your oven. So create some vents for the steam to escape from.
Get fancy
You can play around a bit making any design you want with the vents just try to keep it up from the pie. Make sure they are open uo so it is well ventilated.
One thing I like to do, but it is optional, is sprinkled about two tablespoons of sugar over the top. I like it just for the looks plus it creates a nice and crusty and sweet top.
Into the oven we go
At this point, you will put it in your oven. Most ovens in general you will bake it at 375. I would check it in about 45 minutes. It could take up to an hour or so depending on your oven.
Also keep an eye on it while it’s baking. You might want to rotate it if one side starts to brown or burn early.
If using a convention oven, reduce the temperature to about 350. Check it after 40 minutes to make sure its cooking right.
In about an hour you pie should be golden, and the filling is bubbling. Remove it from the oven and allow it to cool for 1 to 2 hours at room temperature.
—My Friends Pie Crust Recipe made with Butter—
Pastry dough – double crust
3 cups King Arthur all-purpose flour (Red bag)
2 sticks (1 cup) cold unsalted butter (any brand wrapped in foil)
1 cup ice cold water
2 tablespoons sugar
1 teaspoon fine salt
Directions making the dough
1. Add all your dry ingredients to a chilled glass bowl and tossed the mixture with a fork.
[sc:clearboth]
2. Cube your fats into small pieces and add to the bowl.
3. Using just your finger tips rub the cold fat into the flour. Stop when the mixture resembles cracker crumbs and tiny peas.
[sc:clearboth]Do not use
the water/oil mixture all at once
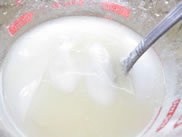
4. Whip the ice cold water and oil until it looks cloudy and the mixture looks a little foamy. Quickly add two thirds of this liquid to the dry ingredients and toss with a fork. If it is not coming together add the remaining liquid.
Do Not over work the dough.
It will make it tough.
5. The dough should look somewhat dry but come together when squeezed in your hands.
[sc:clearboth]
6. Now divide this mixture in half to make two balls by squeezing it all together. Compress and flatten the balls to form two large disks.

7. Wrap disks tightly with plastic wrap and chill for 30-60 minutes. You can freeze them for two months by adding a foil wrap to the covered disks.
[sc:clearboth]
8. Your dough is now ready for your favorite pie recipe.
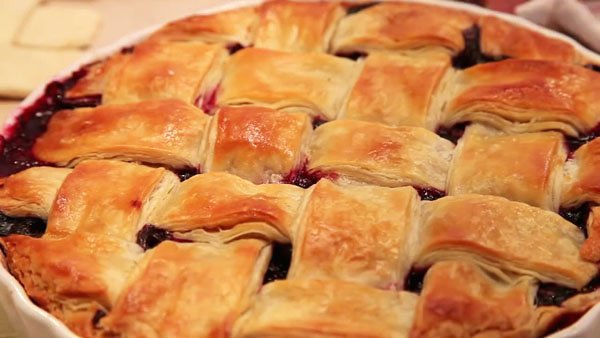
Lattice, if you like
If you don’t want to do something so traditional, you can do a lattice pie. You will be using the exact same pie crust recipe.
When you go to roll it out instead of trying to get a circle make a rectangular shape. Then you just cut out strips from your pie dough.
I usually get a large plate and put it upside down. Cover it with a piece of parchment or wax paper. You can start building you lattice on this.
How to get a perfect looking lattice. Build it on…
You don’t want to build directly on the pie because the fruit will discolor your lattice if you need move it around which could get messy.
Start with one strip towards the center and kind of criss-cross wiht the second strip. Move it around to create the spacing you want.
I just cut the strips with a knife, pizza cut works fine too. I like to eyeball my strips but you can use a ruler to keep it straight and even. One thing nice about a lattice top is it has natural vent in there.
You can do your lattice thicker or thiner to create different looks. It does not really matter, its up to you. At this point I would stick it in the freezer for 10 or 15 minutes. That the pieces are not soft and they are not going to shift on you when you slide it onto your pie. And they’ll keep there shape better.
That’s the nice thing about using a plate, it gives you a little shape of a dome and about the shape you are looking for on your pie.
After you pull it out of your freezer you would easily slide it out over your pie. Make the readjustment you need to make.
Just pinch off the ends or trim with knife. Again you want to egg wash the lattice before it goes into the oven. Try not to get it on your filling just the crust.
By handling the pie dough like I have shown you, not over mixing, keeping it cold, and hand folding it. You will have flaky layers and a tender pie crust. You will see those wonderful layers you created with yor pie dough when it’s baked.
Enjoy my friend.
Interested in Pies?
The Next Generation – Pies for today and tomorrow
How to make mini pies. Mini pie hands-on experience…
Mini Pie the count, hands-on experience
[sc:ADbottom]