From Start to Success for 2016
You want to start a food blog. Great! But you’re a complete idiot when it comes to the Internet. You have no idea where to start. It’s so confusing and it seems complicated.
I’ve been there. So, I know where you’re coming from. I needed help when I started. A kindred spirited blogger took a special interest in me and mentored me through the belly aches of building a successful and profitable food blog.
Fantastic! You Want to start a food blog but don’t know how. Whether you want to start a cooking blog, or you want to become a successful food blogger, the information you find here will help and be your road map to success.
Now why should you follow my guide on starting a food blog?
One, it’s the only guide to include step by step videos.
Two, I don’t jam information that you really shouldn’t worry about when you are first starting. Lastly, I don’t just stop at showing how to build your food blog, but I go beyond. What’s next? What goals you should have in your very first month if want success.
How to write content and take photos for your food blog? And much more so that you’re not left floundering out there in the vast online smorgasbord.
From one friend to another take it easy and just have fun starting your food blog. When it does happen, be happy to earn your first $100.
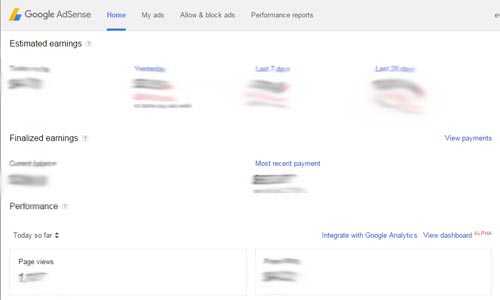
I went from zero to where now I earned over $500 a month. In December 2015, Google deposited $693.30 into my bank account for placing their ads on my food blogs, and this is just from one of my revenue streams. Here’s a screenshot of my account with Google. Google restricts posting my report. So just to be safe, I’ve blurred out my report from December 2015.
Sadly I could have done better, but I followed advice from someone who knew nothing to little about cooking websites.
I joined a $399 membership that offered no 1 on 1 coaching, they gave advice that almost killed my food blog. The information you’re. Getting here is from a food blogger.
Number one: self-host your food blog. All of the pro bloggers are self-hosted websites. So stay away from Blogger.com or WordPress.com.
Anne-Marie Nichols from This Mama Cooks! On a Diet says: “My biggest mistake was not switching over to a self-hosted WordPress blog sooner! Once I did that, my traffic and opportunities grew.”
Number two: Don’t spend hundreds of dollars getting started. If you can afford a good cup of coffee, you can afford to start a food blog. Because you are here, I’ll show you how to do it yourself for virtually free.
The funny thing is I almost enjoy building food blogs more than baking pies to where now I have built over twelve separate food blogs in the past six years.
I want to teach you how to build and run your very own food blog. Let me be your mentor.
Maybe you’re starting a food blog just for fun because you have a strong passion to cook or bake; you have the love of food.
Or maybe you want to show off to the world what you can do.
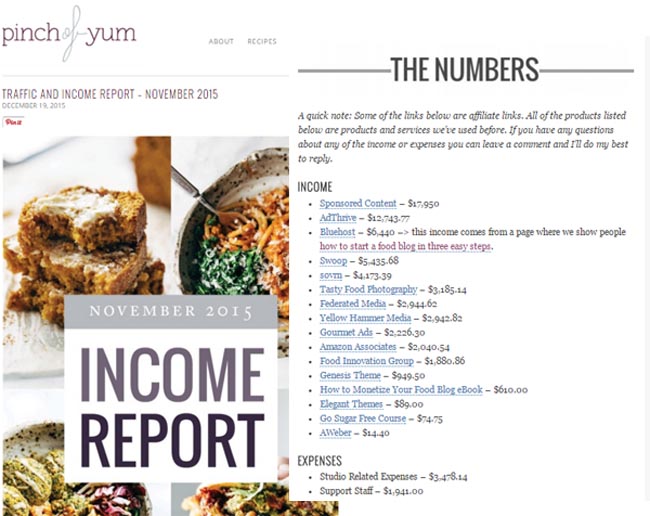
This might be a surprise to some of you, but did you know you can earn a living from your own food blog making thousands a month. How about over $61,000/month. Did your jaw drop to the floor? You doubt me? Read Lindsay and Bjork income report from Pinch of Yum below:
It will take hard work and devotion. However, the potential is there for a life rewarding business.
I know you know absolutely nothing about building your own blog. However, you do know how to cook and you enjoy it. Right? That’s why you’re here.
You taught yourself by reading cookbooks, viewing recipes online, and most importantly by watching others. I sure do miss Julia Child.
Okay. Why not learn the same way for starting your own food blog?
Instead of a watch-and-cook. We’ll do a step-by-step watch-and-blog recipe for you. I left no ingredient out or any steps along the way.
All you have to do is copy everything I do as I build a sleek professional food blog from nothing to a mouth-watering delivery of delicious recipes.
You can go at your own pace. Do it all at ounce or break it up, just keep track of the step you’re on.
All the steps to Start a Food Blog:
- Find a Domain name, your food blog online address.
- Register your domain name with Bluehost. It’s free with their service.
- Sign up with a web hosting company. If you plan to follow me, use Bluehost. It’s a great place to start with little money.
- Install Blogging content management system.
- Install my free ‘My Food Blog Style’ plugin.
- Configure your blog.
- Build your homepage; it’s like the book cover for a dynamic cookbook.
- Add your content like: recipes, photos, and something about yourself.
- How to write recipes?
- Food Blogging Study Guide: How to write compelling content and describe food?
- Now add new blog content ounce a week or at least twice a month.
1Find a domain name for your website.
By the way, most food blogs are really websites.
Let me explain what this is and how to choose a domain name. First, here are some domains you already know quite well and probably did not know what they were called: google.com, amazon.com, and ebay.com.
 A domain name is like your home address. Anyone who wants to send you a package or find out where you live must have your physical address like: 1111 Honolii Place, Hilo, Hawaii 96720.
Without having or sharing your physical address your friends can’t visit you or find you. Your domain name is the address to your food blog on the Internet.
The beauty of the thing is you get to come up with the domain name (or address to your food blog). The not so good news is you must choose a meaningful name that no one else has chosen in the whole wide world.
Disclosure: Please note that some of the links below are affiliate links, and at no additional cost to you, I will earn a commission if you decide to make a purchase. Please understand that I have experience with Bluehost, and I recommend them because they are helpful and useful, not because of the small commissions I make if you decide to buy something. Please do not spend any money on these products unless you feel you need them or that they will help you achieve your goals.
I guess you know food.com is taken, choose something unique and relevant to your blog.
For instance, if your passion is to have a blog on pies, choose a domain name that includes the word pies like: michellespies.com.
Video 1 – Find a domain name for your website.
It’s important to keep it simple, all lowercase, and must use the ‘.com’ at the end. The name should identify what the food blog is about. Also, don’t use any hyphens in the name or awkward spellings. When you give out your domain name you don’t want to make it difficult for someone to enter it correctly.
Coming up with a name for your new blog might be the hardest step. You can start brainstorming by coming up with a short mission statement or by listing words that describe your cooking style, your lifestyle, your background, etc. Throw in your name.
Characteristics of an ideal blog name:
- Descriptive
- Memorable
- Short
- Easy to spell
Once you have some potential names in mind for your blog, you’ll need to check their availability. Since .com is the standard domain suffix, stay with it. trying potential names until you find one that is available.
Don’t resort to hyphens, literal numbers, or other punctuation marks to make it work. they’re too hard to remember and say.
Here’s a handy domain name checking tool I use from Bluehost. Enter your desired domain name, make sure .com follows it, hit “Check domain” and it’ll tell you if your domain name is available. If so, snatch it up. If not, try other variations.
Once you have picked your idealct domain name, write it down. Bluehost will allow you to register it for free.
2Sign up for website hosting.
Your food blog needs to run or execute on a powerful computer that can communicate with the Internet 24-hours a day, 7-days a week.
It’s foolish to use your own computer, for one it would be too expensive, and cost thousands of dollars.
 Instead of doing that you need to rent a small piece of a very fast computer owned by a web hosting company for a very small fee. How about $3.49/month? So the price of a cup of premium coffee, you can have your food blog hosted for a whole month. Not bad for a website that could earn you hundreds later.
Since you are here to learn how to do it yourself (DIY) and will be using my FREE Tools, that is all you must spend to start blogging today.free tools
Later on, I’ll show you how your food blog will earn you money even if you’re doing it just for fun.
Feel free to use any web hosting company. However, all of my free instructions here are for Bluehost. They’re a good company, and it’s where I host my smaller food blogs. You can always change later to another web hosting company. So don’t feel locked in.
You’ll want to start with an affordable website hosting company that offers good reliable service, start with Bluehost. They require you to pay 12 months or 36 months in advance to get the $3.49/month deal. However, you can cancel anytime and the unused portion will be refunded to you. Don’t worry. I have used them for years.
Bluehost is affordable, reliable, easy to set up, and has 24/7 customer support. Food bloggers love Bluehost. And Bluehost works hard to please food bloggers.
Good to know: Purchase your hosting through any of my links to Bluehost and you’ll get the best deal available. No promo code required.
Bluehost’s “starter” plan is about as cheap as hosting gets.
First, choose your plan. You’re just starting out and shouldn’t be spending larges amount of money. So, I recommend the starter plan, which is the least expensive and offers everything you need to get started.
ADD MY OWN PICTURE
Now, choose your term. In order to get your free domain name for a year (a $15 savings) and a significant discount on your monthly rate, you’ll need to pay for at least one year of hosting upfront. If you’re real serious about food blogging and want to save even more money, feel free to elect for a longer term to save more money. However, one year is a great start.
MY OWN PIC
Lastly, choose your add-ons. The only add-on to choose is “Domain Privacy Protection,” which is used to block some of your personal information getting out like your full name and private email address. Otherwise, your personal information will be available to marketers and the public at large. If you’re on a tight budget, you can elect to do this later.
MY PIC HERE
You wrote down your domain name. Make sure you have the spelling right. You will need it to register with Bluehost: So here we go click on the link below and follow what I do in the videos.. Have your domain name ready:
Video 2 – Sign up for website hosting.
Are you ready to start? Then let’s go! It’s time to sign up with Bluehost for a web hosting account. For a very small fee as low as $3.45/month, Bluehost is allowing you to rent a section on their super fast computer to run your food blog.
3Install Blogging content management system.
Your food blog needs to run or execute on a powerful computer that can communicate with the Internet 24-hours a day, 7-days a week.
It’s foolish to use your own computer, for one it would be too expensive, and cost thousands of dollars.
#Here>> Now you’re registered with Bluehost, it’s time to install WordPress the food blogging content manager computer program. This part is pretty easy if you’re using BlueHost, all you need to do is follow exactly what I do in the following video.
Once WordPress is install, we need to do some configuration.
We set your Permalinks, a place to store your photos, disable features you don’t need. Don’t worry. It’s not hard. I show you everything in the video below.
Video 3 – Install Blogging content manager.
#Here>> Install a WordPress Theme.
Now we’re getting to the fun part, dressing up your blog. The theme we’re using is called twenty-sixteen. Remember, this is like the clothes for your food blog. It kinds of sets the design or fashion to your site. Twenty-sixteen is a special theme provided by the team who programmed. WordPress. That means it’s stable and will e be supported for years.
You want a WordPress theme that’s:
Well designed: Your theme should look professional and be current with today’s style. You want a clean and minimalist look. It should support that you keep a clean, well-organized kitchen.
The theme should also be written by an experienced computer programmer.
- Responsive. A Responsive food blog is a cooking website that is optimized to work on different devices without frustratung the experience for your visitors, whether they’re visiting from their computer, smartphone or tablet. That means your visitors won’t have to pinch and zoom to read your posts—your text and layout adjust automatically to the right size and location.
- Optimized for Google search results: This goes along with the last couple of points, a well-designed site will naturally rank higher in search results than a site built on a theme tha. Is outdated and not search engine optimized. (Seo.)
- User-friendly: use a theme that offers built-in design options so you don’t have to fuss around to change basic stuff. It will save you a ton of time. Your theme should make it easy for you to change your logo, color scheme, and font style.
- Backed by great support: you’re going to want support when you have problems and technical issues. A responsive support team and/or community forums are a must.
My bottom line: the free twenty-sixteen theme is a safe place to start. However, once you have some experience under your apron, pony up some cash for a premium WordPress theme from a reputable provider. The time and head banging that you save will make it money well spent.
Video 4 – Install Blogging content manager.
#HERE>>> Install WordPress plugins.
Each of these plugins provide valuable features that might not automatically come with your theme.
Recommended WordPress plugins for food blogs:
My Food Blog Style: This plugin adds useful shortcodes or tools to add features to your food blog.
How to install a WordPress plugin
Easy! Go to your WordPress dashboard and look in the sidebar for “Plugins”. Hover over “Plugins” and click on the “Add New” option. Then look for the “Search Plugins” field or upload from your computer and search for one of the plugins by name. When you find it, click “Install Now”. Then, configure the plugin settings as directed.
Download the My Food Blog Style plugin
Step 7: Start blogging!
Congratulations!!! Now you’re ready to start publishing posts on your new food blog.

How to Start a Food Blog – Study guide
99% of the information of starting a food blog only address the mechanics on the subject. Like picking a domain name, setting up a web hosting account.
Once you got your blog online, then what? That is what I thought, you don’t have the faintess idea. Okay, some of you might think you do.
So here is a concise guide on starting a food blog the professional way.
We’ll talk about the must-have pages you need for a professional food blog and how to fill them out. You’ll learn how to write your recipes, how to stand out from the crowd of bloggers.
This is the start here place for launching a successful food blog. So strap on your apron because you’re about to tell the world about the next great dish, you.
On day one:
You need to find your voice
It often takes quite a while for anyone to pay attention to your blog. There aren’t any rules about how you should blog, except for one big rule: Always Provide Value for your audience.
It’s true the best food blogs have a style that you can instantly recognize when you see their photos or writing out of context. However, if there’s no value they won’t return. So think about your visitor. Do you have a good description of your avatar? Are you writing for busy moms starting a new family between the age of 25 to 36 seeking simple nutritious meals for a family of four.
Don’t try to please everyone. Just target your ideal avatar. Research other blogs and work out what you like about your favorite ones.
Choose a niche
In order to stand out in the sea of food bloggers, make sure you think about your own niche. What is it that you want to cover? Do you want to post about easy cooking? How about healthy eating? Maybe you’re a master at making desserts? Or is baking your specialty? You may even be an all around chef who perfects a dinner from start to finish and would like to teach others how to create dinners for parties?
Choose a niche and focus on. It doesn’t mean you can’t publish anything else related. If your recipes are for career moms, 10-20% of your material could include time management, home decoration, or just about the family on-goings.
Time to start cooking and typing
So now that you have your site online what is the next step? Blogging is all about doing, and not thinking or planning too much. But set goals. Have a goal to publish a recipe a week.
If your stuck, just started cooking and typing. Start cooking, taking pictures and typing yourself!
Before you get cooking, write down everything that comes into your head. You’re going to want to share all of it with your readers, so that they understand that you are pensive, but also totally relatable. When you’re done, figure out a way to begin your first blog post with a bang. I suggest something ponderous, such as “Why does the sun seem so bright today?” or “What is the real purpose of the little toe—is it just there to be cute?”
1. Have A Good Hook:
“I have nice memories of my mom’s quiche recipe with spinach.” -or- “As a kid there was no way mom was ever going to get me to eat spinach except by hiding it in mountains of melted cheese and baked eggs. Twenty-six years later it’s still the only way I’ll eat it.”
Although the first one gets the point across, the second presents a personal drama through humor and has a better chance of holding the reader’s attention. By hooking your reader you catch their interest and encourage them to continue reading.
The first few lines are the second most important as they should immediately grab the reader’s attention.
2. Use Your All Senses
Use Your All Senses – sight, sound, smell, and feel in writing: Here’s a writing exercise when it comes to food writing. How would you describe a lemon to someone who has never seen one or blind? What this means is you need to use alll your senses in order to create a mental image for someone.
Give them an image where they can see themselves there. What does the lemon taste like, what happens when you taste it, what might be your reaction? What sounds does it make when you sqeeze it? What are the smells involved? What happens when the juice touches a tender tounge? All these questions can be answered through sensory descriptions which will help develop colorful and engaging writing.
For example, when an egg hits a hot skillet you could say you hear the sizzle and pop of the oil as the hot fat meets outer goowy protein. The translucent edges of the white slowly fog up and turns to opaque white, eventually the edges browns to crisp and curl up as they brown. The smell of frying eggs wakens the family alarming it’s. Breakfast Time. Mention any memories it recalls from your past, good or bad.
3. Spellcheck:
Not only does bad spelling discourage readers it makes you a less credible writer. Spellchecking is one of the easiest ways to catch simple errors that might otherwise mar your message.
4. Grammar, Capitalization, & Punctuation:
I make grammar mistakes all the time. More than I care to admit. At least, give it your best shot and use tools like Grammarly.
5. Read Your Post Out Loud or have someone else read it:
It is one of the best ways to catch errors, clunky sentences, and awkward phrasing. Think of your blog as a public speech, you’re putting your words out for everyone to hear.
6. Wait a Little Bit Before Posting or at least, review your post the next day:
Have you ever had a post go up and then you read it a while later realizing that it’s not quite right? More than once I’ve wondered how I didn’t catch that awkward sentence or questioned if
One of the best things you can do for your post is to ignore it for a while. When you come back your mind will be fresh and awake and you’ll notice any clumsy stuff that didn’t work and or just sounds stupid.
7. Support or Back Up Facts:
If you plan to state that something is true, you better be ready to tell your readers where you got the data. Stating facts and backing them up tells your reader that you are a credible source. If you can, link to your sources.
If you plan to state that something is true, you better be ready to tell your readers where you got the data. Stating facts and backing them up tells your reader that you are a credible source. If you can, link to your sources.
8. Don’t Plagiarize.
Enough said.
9. Your posts should take your reader on a journey.
Tell them what you are going to tell them, and how it will benefit them, the introduction. Tell them what you want to tell them, the body. Tell them what you just told them, the conclusion.
A new paradigm for food blogs
In 2010, the most important content on your food blog was the words. That has all changed in 2016.
The most important content on your page is your IMAGES. Pictures are a virtue. They must look professional.
Pictures are a virtue
Like with many other topics, when it comes to food, pictures are a must. You want to present your food recipes in such a way that they are appetizing. The reader is inspired to share your pictures – and hungry for even more recipes.
I think we can blame Pinterest for this movement. Readers will judge you faster by your images than your writing. So spend some time on what it takes to take good photos.
In terms of styling, the best advice is to keep your photographs clutter-free. This is the key to taking good food photographs is using natural light if all possible – it’s best on a cloudy day. You don’t need an expensive camera – a lot of bloggers use their iPhones and Androids. I now have a Canon Rebel 4Ti but used a Canon PowerShot for years something I just came to appreciate. Your food is the subject and you want it to shine.
This is the key to taking good food photographs is using natural light if all possible – it’s best on a cloudy day. You don’t need an expensive camera – a lot of bloggers use their iPhones and Androids. I now have a Canon Rebel 4Ti but used a Canon PowerShot for years something I just came to appreciate. Your food is the subject and you want it to shine.
You don’t need an expensive camera – a lot of bloggers use their iPhones and Androids. I now have a Canon Rebel 4Ti but used a Canon PowerShot for years something I had already. Your food is the subject and you want it to shine.
Your food is the subject and you want it to shine. So for now, take all your photos on white dishes and platters with earth tones for the surface. That’s all you need to know for now. Later on, you can explore more complicated settings.
Now you’re ready to build out the site.
Your site needs to start off with a home page, recipes, blog, about and contact page.
Homepage-
Headline: Within 3 seconds, a food blog needs to tell visitors what the site has to offer. Keep it clear and simple.
Tagline: should offer a brief description of what your niche is. Zero in on a common point for your target audience.
Your front page of your food blog must provide three directives:
- Dynamic information, the most current content (post) that you have.
- Static statement, you want to also provide some static content. This is your most popular, stellar, or high demanded content.
- An invitation, you want to provide content for new visitors to your site. Welcome them and give direction what to do next.
All three need to follow with a call-of-action for your visitors. Maybe to gather their email address or getting them to subscribe to your food blog.
What is a food blog? Think of your food blog as a dynamic cookbook. A food blog is a living, breathing dynamic cookbook where the content is always changing and growing. The homepage to your food blog is like the book cover to your dynamic cookbook with various categories which contains more than just recipes.
It might have a section on cooking times, how to set place settings, where to shop, and sometimes they even tell a little story about the author of the book. Your food blog is the same way except for it is dynamic.
Most cookbooks contain more than just recipes. So you want food blog to be similar. Don’t just be a recipe generator.
Supporting images: most people are visual. Make sure to use images that capture the emotion and stomachs of your reader.
Benefits: Describe what you have to offer and why it should matter to your audience.
Navigation: Make sure the navigation is visible at the top of the page and at the bottom. Include a search box if you can.
Content: show case your best stuff here along with new content.
Primary CTA – call-to-action: The goal of your homepage is to compel visitors to dig deeper into your website and move further down the funnel. Include a CTA above the fold, content visible at the top of the website.
Recipe page: Show recipe with a single image tiled across the page with titles.
About page: The About page is where you give people just enough information about you to want to know more.
Rather than begin by talking about what you do, begin your About page with a line or two about why you do it. This should be the element that guides you through the writing process for your About page.
You might throw a few vital details on your about page, like your name (always a good place to start) and your credentials, and promises you plan to fulfill later.
Why Is An About Page Important?
It’s the way to show off both your importance and your individuality at once, impressing people and engaging them at the same time. The About page is where you give people just enough information about you to want to know more.
For the reader, it should feel like they’ve met you in person, looked you in the eye and shaken your hand.
Think About How You Serve the reader
Rather than begin by talking about what you do, begin your About page with a line or two about why you do it. This should be the element that guides you through the writing process for your About page.
Make Your Credentials Fun
It’s important to list the things that give your business credibility—an advanced degree, an impressive title or certification, a number of years in your field or successful working relationships with noteworthy people.
Show Your Non-Professional Side
Are you surprised to learn that part of your About page that really sells you is the part where you talk about something besides work? This really seals the emotional connection with people and allows them to get to know you on a more personal level. Not only that, but this section is what sets you apart from your competition. Nobody else has the same story, the same style, the same quirks and personal passionss that you have.
Create an “Call-to-Action Step”
By now, your audience has fallen head over heels in love with you…so what’s the next step? Where does the relationship go from here? This is the time to offer them a concrete action step. Offer a free opt-in gift, list links to your five most popular food blog posts, tell them sign up for your newsletter. Whatever your specific call-to-action is, make it simple and immediate for them to make the next move.
Write in the first person: This can come down to personal preference and your audience. First person point of view is the most intimate way to write you bio.
Here you’ll learn how to write recipes and follow a few rules.
Knowing how to write a recipe is something even an amateur cook can benefit from knowing. Especially when it comes to entering our contests… (hint hint).
There are two main parts of a recipe, the Ingredient List and the Preparation Method. I’ll take you through some basic guidelines for writing both parts.
This is our own style guide and loose list of rules. Of course, there are endless exceptions and little side-rules. There are also styles that certain publications use that you may be used to and that may be different from what we present here. If you have a question that isn’t addressed in the below guidelines, please ask in the comments.
Before the ingredients comes the title, number of servings and serving size if appropriate. Then the ingredient list and the preparation method. If the recipes is adapted from another recipe, a credit is due (“Adapted from Dorie Greenspan’s World Peace Cookies”) below the text of the method.
The Ingredient List
List all ingredients in order of use, as described in step-by-step instructions.
List the most important ingredients first, if it can be consistent with order of use.
Spell out everything: tablespoons, ounces, etc.
If the recipe has different elements (a pie, for example, has a crust, a filling), break up the ingredient list with headings such as “Crust” and “Filling.”
When several ingredients are used at the same time (in the case of baking, often all the dry ingredients are sifted or mixed together at once), list them in descending order according to volume. If there is an issue over preparation, list in order, so for example if you need the zest and juice of a lemon, list the zest first and then the juice since that is the order you will do the preparation.
Do not use two numerals together. You need to set off the second number in parenthesis. This comes up with sizes of packages. For example, “1 (8-ounce) package cream cheese.”
If an ingredient begins with a letter instead of a number, freshly ground black pepper, for example, capitalize the first letter, as in “Freshly ground black pepper.”
If the preparation of an ingredient is simple, place that technique in the ingredient list, as in “2 eggs, beaten” or “1 stick butter, softened.”
If an ingredient is used more than once in a recipe, list the total amount at the place in the ingredient list where it is first used, then add “divided.” In the method part of the recipe, indicate the amount used at each step. For example “1 cup all-purpose flour, divided” then in the method “Sift 3/4 cup of the flour with the…” and later “Sprinkle the remaining 1/4 cup of flour on top of…”
Use generic names of ingredients (semi-sweet chocolate chips, not “Tollhouse chips”
The Preparation Method
Where helpful, indicate the size of bowls and cookware. For example, “In a large mixing bowl….”
You do not have to write complete sentences. Be as short and concise as possible.
With instructions for the stove-top, indicate level of heat. For example, “Simmer over low heat.”
State exact or approximate cooking times, with descriptive hints for doneness, if appropriate. For example, “Sear 1 minute on each side,” and “Bake 18-22 minutes, or until crust is light golden brown.”
As in the ingredient list, if there are different elements to the recipe, as with the crust and filling of a pie, separate out each element in the method. Begin with the crust and write a header “For the Crust” and give the method. Then do “For the Filling” and give filling instructions.
Separate each step into a different paragraph. If you are mixing dry ingredients in a bowl, for example, use one paragraph for all the instructions for that step.
Finish with serving instructions including how to plate, what temperature to serve, how to garnish.
The last instruction should be regarding storage, if applicable. For a cookie recipe, for example, “Cookies will keep at room temperature in an airtight container for 3-4 days.”
A Final Note on Recipes
You should test your recipes to make sure they work, the amounts and serving sizes are correct, and that they taste as great as you intend. If you are “testing as you go” make sure to take perfect notes. For beginners, and most of us pros, repeat testing and revision are needed. It helps to have other people follow your recipes to see if they actually make sense.
Food Blogs are here to stay, Always the Trend
According to a study from Google cooking is one of the most popular topics people search for when needing advice and instructions.
Starting a food blog is a great way to document your recipes, share your love for food and cooking with others and become an even better and more creative cook. It is also a great way of getting in touch with other foodies, and exchanging tips and ideas.
Download the My Food Blog Style plugin