Learning the Technique in Mixing Pie Crust Ingredients, Step by Step and more…
Posted by Pie Guy
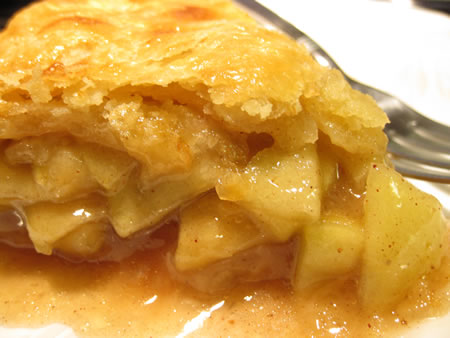
The right way in mixing the pie crust recipe ingredients.
The secret
of making a flaky pie crust
is knowing the Technique.
—
How to mix the ingredients.
[sc:clearboth]
Is your pie crust a disaster? Do you hesitate making homemade pies because you fear making the pie crust?
The secret to a good pie crust is your technique
The secret to a successful pie crust is your technique. It is not special ingredients. It is not special pie equipment. IT IS NOT YOU. You are just using the wrong method.
[sc:ADtop]
Making a great pie crust is a craft that you can learn. Get the skills you need by following these step by steps.
Knowing how to mix the ingredients for your pie crust is your key to heavenly pies. You got to get the technique right. Otherwise your pie crust will be less than desired.
Rule number 1:
The pie crust dough shall never reach a temperature above 60° F (16° C).Rule number 2:
Do not. I repeat DO NOT over mix your dough. This will make the crust tough.
Do you have
the kitchen equipment
to make a flaky pie crust?
You need to put everything in the refrigerator for at least 30 minutes. The flour, the water, your rolling pin, the mixing bowl and a fork or pastry cutter all go in the refrigerator.
You will put your butter, shortening or lard in the freezer for at least one hour.
Keep your working surface cold. If you need to, sit a bag of ice on your work surface until you are ready to build your pie crust.
Mixing the pie crust ingredients- Step by Step:

1. Mix the dry ingredients in your chilled bowl: the flour, salt and sugar.
[sc:clearboth]2. Okay you are ready for this. Say, I can do it.
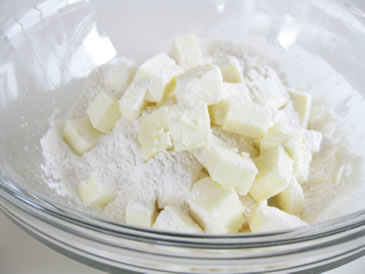
Don’t finger it too much, but you need to cut in your fat. Cut the fat in to 1/2 inch cubes and toss it in with the dry ingredients.
Blend in the fat so it mixes well with the flour but leaving discrete pieces or little chunks of fat the size of small peas. These pieces will create those wonderful flakes.
Using a pastry cutter or the back of a fork, press the blades through the mixture, bearing down repeatedly. Work around the bowl going up and down and around the mixture. Work quickly but do not over do it.
3. Adding the liquid is where most of you will go wrong. Make sure the liquid is ice cold.
Add ice cubes
to your water.
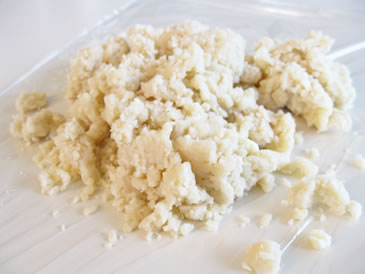
While adding the liquid toss the flour and fat mixture with a fork. Do not pour the liquid in the same spot but drizzle it around the whole surface of the mixture.

Continue to toss slowly with your fork. The goal at this point is to spread the moisture around and not to create a ball of dough.
If this was done correctly the mixture will still be somewhat dry and loose. There will be larger clumps of dough. The flour will no longer look dusty or appear like powder when tossed.
4. Dump the loose mixture on to a large sheet of plastic.
While trying to wrap the plastic around this crumbly mixture, gather and press the dough tightly to form a fat disk.
For a two crust pie recipe divide the mixture on to two different sheets of plastic to form your fat disks.
5. Put the fat disk or disks into the refrigerator for about 30 minutes.

During this time get your pie filling ready.
[sc:clearboth]
The period of rest and cooling before working and rolling the dough is vital to ensure that the fat does not melt and become too soft. It gives time for the gluten to relax.
The rest period allows the moisture to penetrate the dough completely by emulsifying all the flour.
6. Now it is time to roll out the dough. You must roll it out on a cold surface for all-butter pie crust recipes. Remember to keep the dough below 60° F (16° C). A cool surface should work for most other types of recipes (oil, shortening, lard).
The warmer the work surface or the room temperature
the faster you must work.
Roll out the dough starting from the center to the edge. Roll dough to about 1/8 inch thick. Do it carefully but quickly with your chilled rolling pin.
Try rolling dough
between sheets of foil.
Lightly flour the surfaces as you roll. Remove excess flour from dough with a pastry brush.
7. Transfer the rolled dough to your cold pie pan. You can fold the dough in half. Or you can roll it around your rolling pin to assist in the transfer.
If you used sheets of foil or wax paper, simple peel the top sheet off the dough and use the bottom to help move the dough over the pie pan. Flip it on to the pie pan and slowly peel off the remaining sheet.
Trim the dough even with the edge of the pie pan for a two crust pie. Or trim the crust to about a 3/4 inch overhang.
To prevent a soggy bottom crust
brush on a egg wash
prior to filling your pie.
[sc:clearboth]
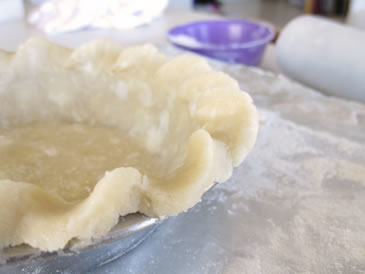
8. Put the pie crust back into the refrigerator for 20 — 30 minutes. If this is a single crust pie crimp the edges now before refrigerating again.
9. Fill your pie and repeat the rolling process for the top crust.
10. After applying the top dough to the pie trim it to overhang a 3/4 inch. Tuck this top crust overhang under the bottom crust. Work around the whole pie.
[sc:clearboth]
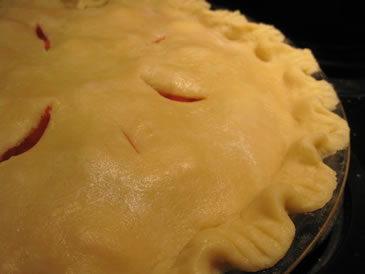
Crimp as desired to seal the top to the bottom.
11. Now cut in vents with a sharp knife for a two crust pie. Five simple slashes with a sharp knife will be enough to vent off steam.
Glaze top with an egg wash
for a golden glossy crust.
12. For the ultimate crust put the whole pie in the freezer for 30 — 60 minutes prior to baking. This will give the pockets of fat a better chance of creating a flaky crust when hit by the heat.
Congratulations! You completed the homemade flaky pie crust step by step.
Interested in Pie Crusts?
Pie Crust Recipes…
Perfect Pie Crust Recipe made with Lard and Butter
Pat in the Pan Pie Crust Recipe made Easy
[sc:ADbottom]